Shadowrocket Quick Start
Using the iPhone / iPad interface, follow these steps to import an existing configuration, choose Global Routing, connect, and verify access. For your first session, establish one working connection before adjusting rules and auto-connect conditions.
Suggested order: complete steps 1–4 first. If an error occurs, note which step it happened at, then go to step 5. Screenshots help identify interface elements; available fields vary with the selected Type and app interface.
Add Server: Add or Import
A subscription link and individual server details are two different input methods. Use the one that matches the information you have.
Have a subscription link? Use Subscribe
Open Home in Shadowrocket and find Add Server, or use the add option on the page. Tap Type and select Subscribe, then paste your complete subscription link into the URL field. Select the subscription type rather than entering the entire link as a single server's Host. You can add a recognizable name as a remark; review the details and save.
Wait for the subscription content to load, then return to Home and check SERVER. One subscription may create multiple server entries. Expand the relevant group, confirm the entries appear, then select one to connect. If you see a group name but no servers, first check whether retrieval is still in progress or the link has expired. Do not turn on the connection switch yet. Updating a subscription retrieves the remote list again; locally edited entries may be overwritten by a later update.
Have server parameters? Enter each field for its Type
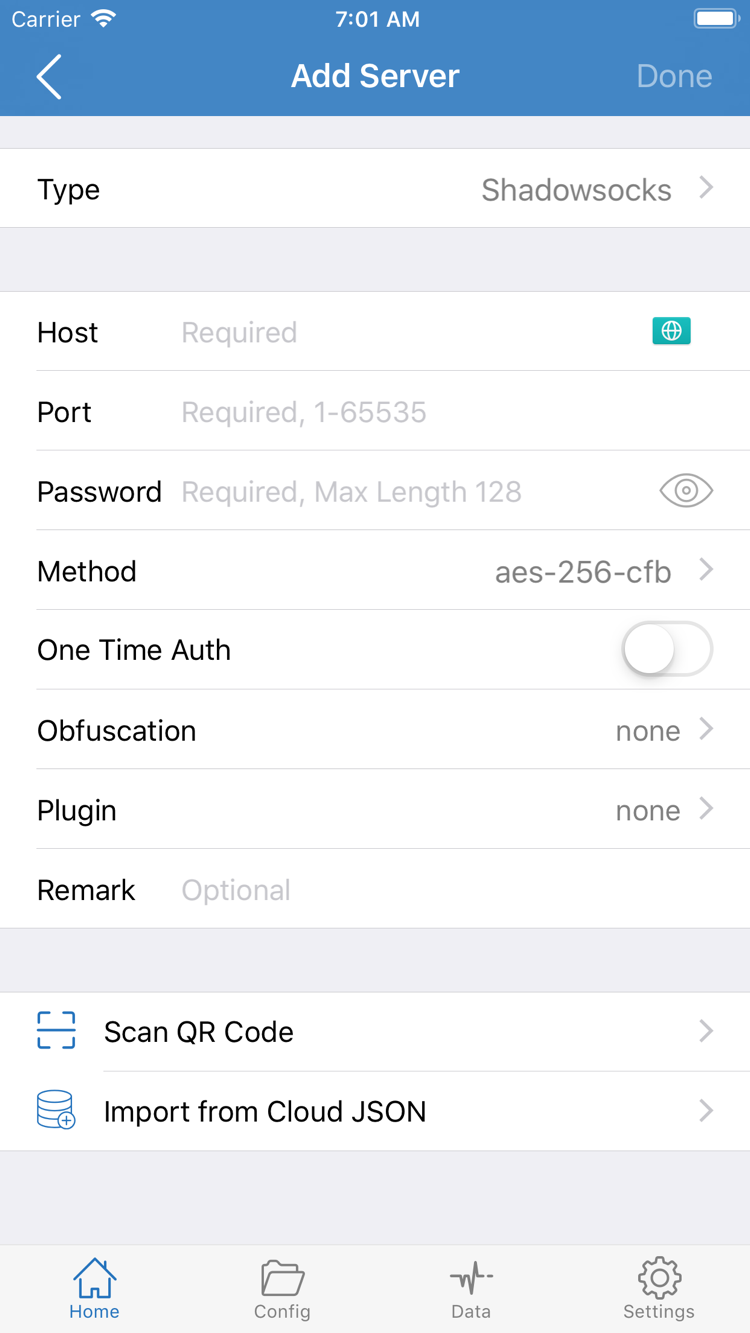
In Add Server, select the Type specified in your details. Enter Host, Port, Password, and any other fields shown for that protocol. Enter the server address in Host without a web page path. Use the supplied Port rather than guessing from the protocol name. The Shadowsocks Method must match the server. For other protocols, enter fields such as SNI, transport method, or authentication details according to the original information. Do not mix parameters from different protocols.
If your details are provided as a QR code, tap Scan QR Code, grant camera access when prompted, and scan it. Import from Cloud JSON is for data in the relevant format; it is not a general-purpose import option for any subscription link. After importing, open the entry and check its Type, address, and port. Server passwords, complete subscription links, and QR codes may contain access credentials. Do not post them on public pages or include them in screenshots.
This step is complete when a recognizable entry appears in SERVER and a server is selected. Saving a subscription only confirms that its details were added; it does not mean the server can connect. Next, choose Global Routing before connecting so that an incorrect mode does not affect your assessment of server availability.
Global Routing: Choose a Mode
The server determines the connection destination; Global Routing determines how requests use that connection.
Return to Home and tap Global Routing. First, understand the three modes: Config applies the policy for each request based on the active configuration file; Proxy routes traffic through the proxy path for connection testing; Direct handles traffic as a direct connection. These modes change routing behavior; they do not correct a server password, subscription expiration, or protocol parameters.
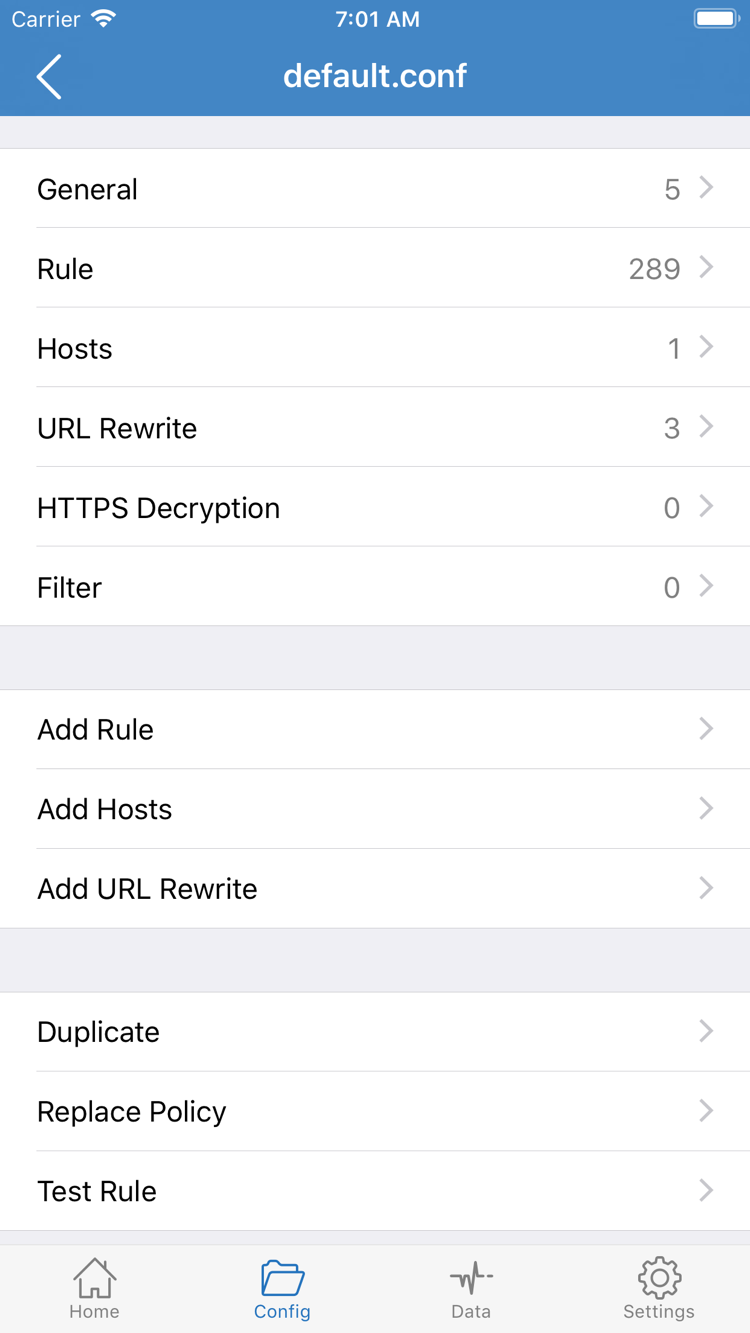
For everyday rule-based routing, select Config, then open Config and check the active file. A subscription containing servers does not necessarily include a rule configuration suited to your needs. Subscribe manages connection details, while Config manages configuration files; they are not interchangeable. Check the file name and content before switching. If you already have a usable file, do not overwrite it just to follow this guide.
The configuration editor includes sections such as General, Rule, Hosts, URL Rewrite, and HTTPS Decryption. For now, focus on the Rule order and the final policy. You do not need to enable HTTPS Decryption for your first connection, or change every section at once. Rules are matched from top to bottom; the first match determines the policy. FINAL should be at the end and handles requests that did not match earlier rules.
The syntax below is a rule example, not server information or a complete configuration to replace your current file. It sends example.com and its subdomains through PROXY, sends the specified address range through DIRECT, and applies the final line to other requests. The example domain is for illustration only. To verify a real request, use the destination you actually visit and your existing configuration.
[Rule]
DOMAIN-SUFFIX,example.com,PROXY
IP-CIDR,192.168.0.0/16,DIRECT
FINAL,PROXY
To distinguish a server connection failure from a rule mismatch, temporarily switch to Proxy and test the same destination for comparison, then return to Config. Do not treat this temporary test as proof that your everyday configuration is correct. For rule types, match scope, and configuration structure, see the rule reference. This page focuses only on the checks needed for your first connection.
Home: Turn On the Connection
Confirm the server and mode first, then allow the system to add a VPN configuration.
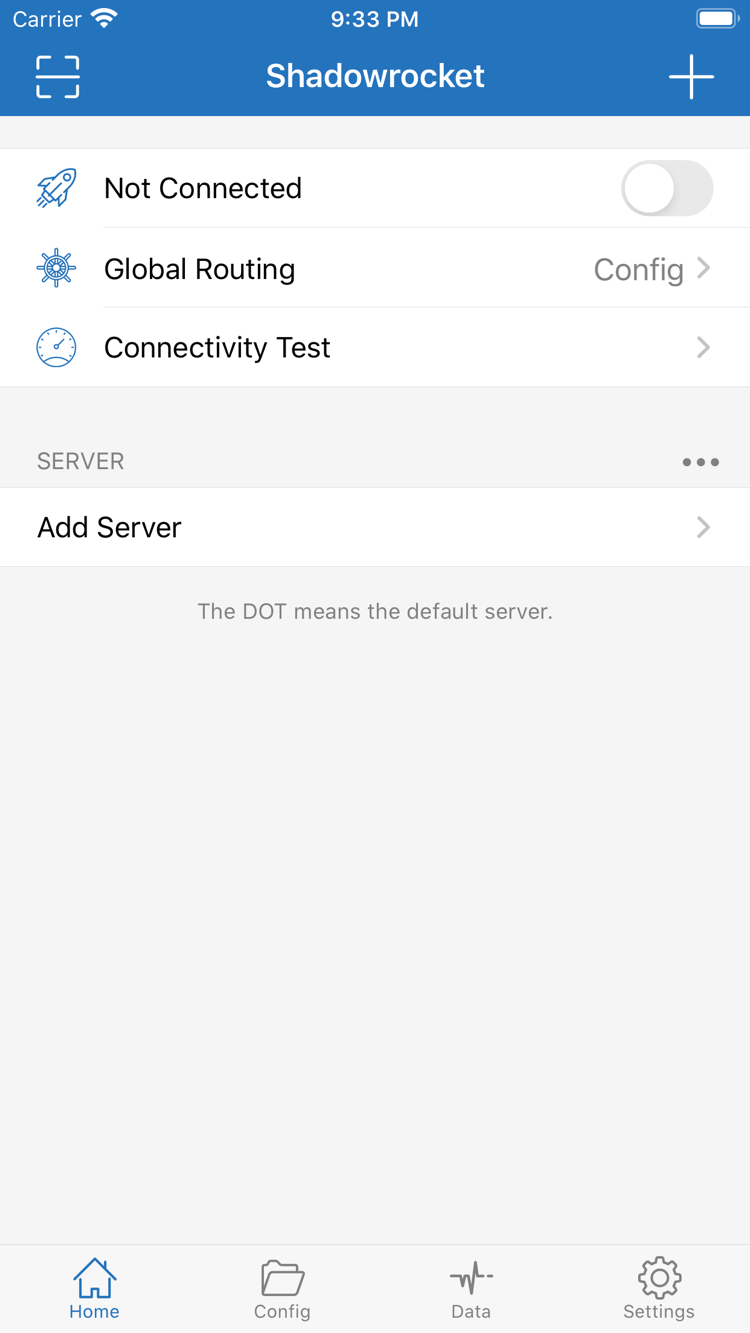
Return to Home and check the selected server in SERVER and the mode shown in Global Routing. If the list contains multiple entries with the same name, open an entry and check its address and group to avoid using details other than the ones you just reviewed. For the first connection, keep your current Wi-Fi or cellular connection stable and avoid setting automatic switching conditions so you can observe each step.
Turn on the switch next to Not Connected at the top. The first time, the system will ask to add a VPN configuration. Allow it after confirming the request was triggered by this Shadowrocket action, then complete the passcode or biometric check requested by your device. This permission allows the system to establish a VPN connection; it does not log in to or change your existing subscription. If you previously canceled the prompt, try the switch again and check whether the system prompt appears.
Return to the app and check whether the status at the top changes from Not Connected to connected and whether the switch stays on. The system status bar or Control Center may also show a VPN status, but that only indicates the system connection state; it does not prove that a destination was accessed using the expected policy. If the switch turns off immediately, do not tap it repeatedly. Note the message and check authorization and configuration in step 5.
If another VPN connection is active, check in system settings which configuration is currently in use. This helps avoid mistaking another connection's status for Shadowrocket's result. On managed devices, VPN configuration may be restricted by management policies; follow your device management requirements rather than repeatedly deleting system configurations. Once the connection stays on, continue to the next step and verify it with an actual request. Do not change multiple settings at the same time.
Connectivity Test: Verify the Result
Check server tests, actual access, and rule behavior separately. Do not draw conclusions from a single status.
Test the server, then visit your intended destination
Use Connectivity Test on Home and check whether the selected server completes the current test. Different Test Methods check different targets in different ways, so a test result does not mean every app will work; a failed test also needs to be considered in light of the method used. First, note whether the result is successful, timed out, or shows an error. Do not use a single number to judge the entire connection.
Next, open a page you actually need in a browser and check whether its text, images, or functions load. Make a fresh request so you do not mistake cached browser content for a restored connection. If only one app has a problem, compare it with the same service in a browser. If all destinations fail, recheck the server details, authorization, and current network instead of immediately adding more rules.
Then check the policy in Config
Under Config, opening a page does not necessarily mean the expected rule matched. You can check the available connection records in Data and compare the destination domain, time, and any policy information shown. Do not guess at details that are not displayed. To record a request, start observing first, then make a new request so earlier cached connections are not mixed up with the current test.
If Proxy can access the destination but Config cannot, first check whether a Rule matched DIRECT earlier, whether the intended configuration is active, and where FINAL appears. If both modes fail, check the server and network conditions. After comparing, restore the intended mode and revisit the same destination. The verification cycle is complete only if the result is also successful after restoring the mode.
Settings: Troubleshoot by Failure Point
Change one item at a time, retest the same destination, and keep the original configuration.
No entries, or the connection switch will not stay on
If SERVER is empty after importing, return to Subscribe and check the complete link. Make sure it contains no spaces, line breaks, or explanatory text added during copying. A link opening in a browser does not mean it returns subscription content that the app can recognize. If it returns a login or information page, check with the provider of the original details. Do not try the same link under multiple Types, or publish it for strangers to test.
If the switch will not stay on, read the system prompt first and check whether the VPN configuration can be added or another connection is in use. If it turns on but access immediately fails, check the server Type, Host, Port, and authentication fields. If Host is a domain name, also check that the current network can resolve it. Missing protocol parameters must be supplied from the original details; changing the test method cannot replace a password or transport setting.
Tests fail, or only some destinations are affected
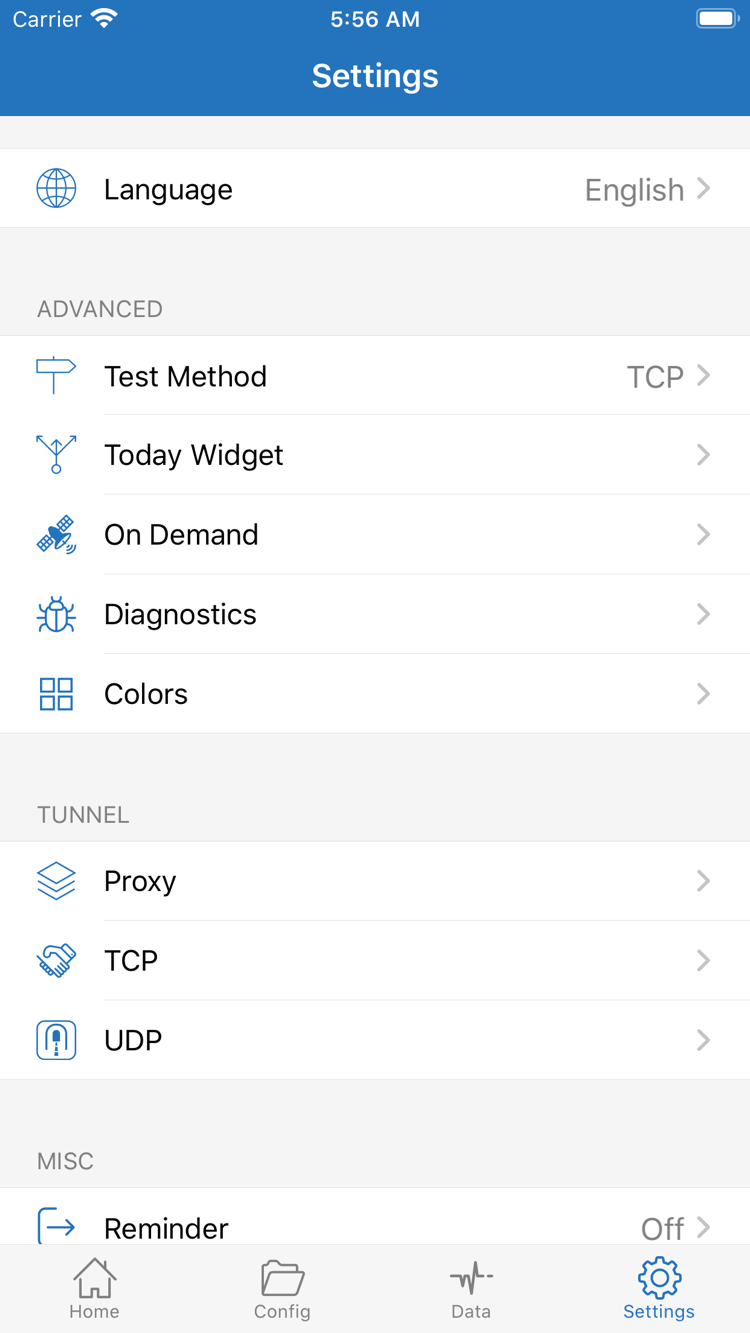
Open Settings and check Test Method to see which test method is in use. If you change it, run Connectivity Test again on the same network; do not directly compare results from different methods. You can retest on your own Wi-Fi and cellular networks to see whether the current access network is a factor. Switching networks helps isolate conditions but does not guarantee that a server will work on every network.
If only some destinations fail, compare Proxy and Config as described in step 4, then check the matching order and domain-resolution settings. If an HTTPS page shows a certificate warning, do not dismiss the system warning or enable HTTPS Decryption just to complete your first connection. First undo unnecessary changes and check the device time, destination service status, and intended configuration, then continue troubleshooting.
Auto-connect and Diagnostics
If the connection resumes automatically or behavior changes after switching networks, check On Demand in Settings. It can trigger connections based on conditions, which may make the result after a manual disconnect differ from what you expect. Before the basic connection is stable, note the existing conditions and temporarily disable relevant auto-connect conditions once you understand their purpose. Verify each condition separately when restoring them, rather than changing Wi-Fi and Cellular conditions at the same time.
For further troubleshooting, use Diagnostics in Settings and note the time of the issue, network type, current mode, and exact error text. Before sharing diagnostic information, check for server addresses, subscription links, passwords, and other authentication details. Hide sensitive information when needed. For rule syntax and configuration priority, see the rules and configuration reference. To repeat the steps, return to Add or Import and test again in the same order.